
We have used different packages to create different widgets in our flutter projects. Flutter community is now much stronger and we have numerous packages or libraries in pub.dev. Have you ever thought of making your own package and upload it on pub.dev publicly? In this article we are going to do the same.

Here we will create a package for showing a countdown timer and also publish it on pub.dev
Prerequisites
- Flutter Installed
- Basic Knowledge of Flutter & Dart
Step 1: Create a Package
If you are using android studio then it’s much easier to create a package template project. Just open a new flutter project from menu and change the project type from “Application” to “Package”.
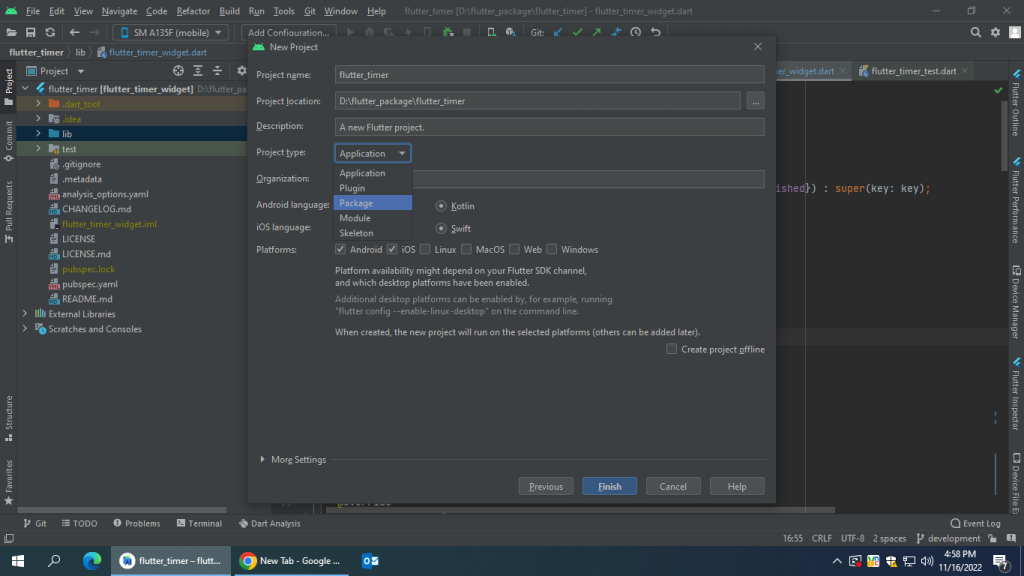
Or else you can run this command on cmd :
flutter create --template=package flutter_timer
Here instead of “flutter_timer” use your own package name.
Now inside the lib folder you will find a dart file with the name of your project. Here we will write our code for creating the timer widget. There are also some other files which are important.
lib/flutter_timer.dart: Here we will write our code for creating the timer widget
pubspec.yaml: This yaml file contains all the metadata that specifies the package’s dependencies.
README.md: This is a markdown file that briefly describes the purpose and functionalities of the package. The contents of this file will be visible as the landing page of your package at pub.dev
LICENSE: This is a license text file. Here you can add any license texts (if you have any) for your package.
CHANGELOG.md: This is a markdown file for tracking version changes of the package.
test/flutter_timer_test.dart: Here you can write the unit tests for your package.
Step 2: Implement a Package
Now we will write the code for our timer widget in the flutter_timer.dart file.
library flutter_timer;

import 'dart:async';
import 'package:flutter/material.dart';

class FlutterTimer extends StatefulWidget {
  const FlutterTimer({Key? key, required this.duration, required this.onFinished}) : super(key: key);

  final Duration duration;
  final Function() onFinished;

  @override
  State<FlutterTimer> createState() => _FlutterTimerState();
}

class _FlutterTimerState extends State<FlutterTimer> {

  var countDownDuration = const Duration();
  List<Widget> timerElements = [];

  late Duration duration;
  Timer? timer;

  bool isCountDown = true;

  @override
  void initState() {
    super.initState();
    duration = widget.duration;
    countDownDuration = widget.duration;
    startTimer();
    reset();
  }

  void startTimer() {
    timer = Timer.periodic(const Duration(seconds: 1), (timer) { addTime(); });
  }

  void pauseTimer() {
    timer?.cancel();
    countDownDuration = duration;
  }

  @override
  Widget build(BuildContext context) {
    countDownDuration = widget.duration;
    return buildTimer();
  }

  void addTime() {
    final addSeconds = isCountDown ? -1 : 1;

    setState(() {
      final seconds = duration.inSeconds + addSeconds;

      if(seconds<0) {
        timer?.cancel();
        widget.onFinished.call();
      }
      else {
        duration = Duration(seconds: seconds);      }
    });
  }

  Widget buildTimer() {
    String twoDigits(int n) => n.toString().padLeft(2, '0');

    final days = twoDigits(duration.inDays.remainder(24));
    final hours = twoDigits(duration.inHours.remainder(60));
    final minutes = twoDigits(duration.inMinutes.remainder(60));
    final seconds = twoDigits(duration.inSeconds.remainder(60));

    timerElements.clear();
    if(days!="00") {timerElements.add(Expanded(child: buildTimerCard(time: days, header: "DAY", duration: const Duration(seconds: 86400))));}
    if(hours!="00") {timerElements.add(Expanded(child: buildTimerCard(time: hours, header: "HOUR", duration: const Duration(seconds: 3600))));}
    if(minutes!="00") {timerElements.add(Expanded(child: buildTimerCard(time: minutes, header: "MIN", duration: const Duration(seconds: 60))));}
    if(seconds!="00") {timerElements.add(Expanded(child: buildTimerCard(time: seconds, header: "SEC", duration: const Duration(seconds: 1))));}

    return Row(mainAxisAlignment: MainAxisAlignment.center,
      children: [
        Expanded(child: buildTimerCard(time: days, header: "DAY", duration: const Duration(seconds: 86400))),
        Expanded(child: buildTimerCard(time: hours, header: "HOUR", duration: const Duration(seconds: 3600))),
        Expanded(child: buildTimerCard(time: minutes, header: "MIN", duration: const Duration(seconds: 60))),
        Expanded(child: buildTimerCard(time: seconds, header: "SEC", duration: const Duration(seconds: 1))),
      ],);
  }

  void reset() {
    if(isCountDown) {
      setState(() {
        duration = countDownDuration;
      });
    }
    else {
      setState(() {
        duration = const Duration();
      });
    }
  }
}

Widget buildTimerCard({required String time, required String header, required Duration duration}) {

  return Card(
    elevation: 8.0,
    color: Colors.white,

    child: Padding(padding: const EdgeInsets.all(8.0),
      child: Wrap(
        children: [
          Column(
            mainAxisAlignment: MainAxisAlignment.center,
            crossAxisAlignment: CrossAxisAlignment.center,
            children: [
              Text(
                time,
                style: const TextStyle(color: Colors.black, fontSize: 40, fontWeight: FontWeight.bold),
              ),
              Row(children: [Expanded(child: Text(
                header,
                style: const TextStyle(color: Colors.black, fontSize: 20, fontWeight: FontWeight.normal), textAlign: TextAlign.center,
              ))],)
            ],)
        ],
      ),),
  );

}
Step 3: Add Documentation
README.md : Add the description of your package with all the features, functionalities and also add necessary images, gifs, screenshots and example codes.
CHANGELOG.md : Update the new changes of your package on the changelog file.
LICENSE : You can add the license for your package if you want. For creating a license you can follow this steps Click Here
You can also add an example project using your package. It’s not mandatory.
Add the name, description and homepage of your package inside the pubspec.yaml file
name: flutter_timer_widget
description: A Flutter Countdown Timer Package
version: 0.0.1
homepage: https://github.com/evanemran/flutter_timer

environment:
  sdk: '>=2.18.1 <3.0.0'
  flutter: ">=1.17.0"

dependencies:
  flutter:
    sdk: flutter

dev_dependencies:
  flutter_test:
    sdk: flutter
  flutter_lints: ^2.0.0

# For information on the generic Dart part of this file, see the
# following page: https://dart.dev/tools/pub/pubspec

# The following section is specific to Flutter packages.
flutter:
Step 4: Publish a Package
- Sign in to pub.dev from your google account.
- Before publishing make sure to review all the files.
- Run the publish command in dry run mode to see if everything passes the analysis.
flutter pub publish --dry-run
- If there is any error solve it and then follow the next commands.
- Run the command below
flutter pub publish
- For authentication a link will be provided on your console. Just copy it, open it in a browser and select your google account.
- Wait for uploading. If everything goes fine your package will be uploaded successfully.
Once done you can search for your package in pub.dev. But this might take a few minutes.
Source Code: https://github.com/evanemran/flutter_timer_widget
My Package on pub.dev: https://pub.dev/packages/flutter_timer_widget
Subscribe on YouTube: https://www.youtube.com/c/CodingWithEvan
Thanks for reading this article. Happy coding.
![Read more about the article OTP Autofill with Google’s SMS Retrieval API [Android]](https://codingwithevan.com/wp-content/uploads/2022/07/Copy-of-Copy-of-Copy-of-Green-Podcast-Minimalist-Blog-Banner-1-300x169.png)

Hi there everyone, it’s my first visit at this web site, and piece of writing is in fact fruitful for me, keep up posting these posts.